Wednesday, January 23, 2008

Lesson 18: Creating Multimedia Applications-Part 4: A Multimedia Player

In lesson 16, we have created an audio player. Now, with some modifications, we will transform the audio player into a multimedia player that could play all kinds of movie files besides audio files. This player will be created in such a way that it could search for all types of graphics your drives and play them.

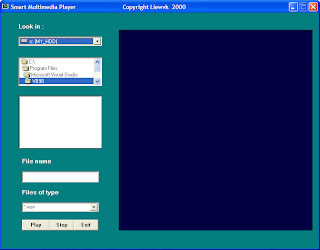
In this project, you need to insert a ComboBox, a DriveListBox, a DirListBox, a TextBox ,a FileListBox and a picture box(for playing movie) into your form. I Shall briefly discuss the function of each of the above controls. Besides, you must also insert Microsoft Multimedia Control(MMControl) in your form , you may make it visible or invisible. In my program, I choose to make it invisible so that I could use the command buttons created to control the player.

  • ComboBox- to display and enable selection of different type of files.
  • DriveListBox- to allow selection selection of different drives available on your PC.
  • DirListBox - To display directories
  • TextBox - To display selected files
  • FileListBox- To display files that are available

Relevant codes must be written to coordinate all the above controls so that the application can work properly. The program should flow in the following logical way:

Step 1: User choose the type of files he wants to play.

Step2:User selects the drive that might contains the relevant audio files.

Step 3:User looks into directories and subdirectories for the files specified in step1. The files should be displayed in the FileListBox.

Step 4: User selects the files from the FileListBox and click the Play button.

Step 5: User click on the Stop to stop playing and Exit button to end the application.

¡¡

The Interface
The Code
Private Sub Form_Load()
Left = (Screen.Width - Width) \ 2
Top = (Screen.Height - Height) \ 2
Combo1.Text = "*.wav"
Combo1.AddItem "*.wav"
Combo1.AddItem "*.mid"
Combo1.AddItem "*.avi;*.mpg"
Combo1.AddItem "All files"

End Sub

Private Sub Combo1_Change()
If ListIndex = 0 Then
File1.Pattern = ("*.wav")
ElseIf ListIndex = 1 Then
File1.Pattern = ("*.mid")
ElseIf ListIndex = 2 Then
File1.Pattern = ("*.avi;*.mpg")
Else
Fiel1.Pattern = ("*.*")
End If

End Sub


Private Sub Dir1_Change()
File1.Path = Dir1.Path
If Combo1.ListIndex = 0 Then
File1.Pattern = ("*.wav")
ElseIf Combo1.ListIndex = 1 Then
File1.Pattern = ("*.mid")
ElseIf Combo1.ListIndex = 2 Then
File1.Pattern = ("*.avi;*.mpg")
Else
File1.Pattern = ("*.*")
End If
End Sub

Private Sub Drive1_Change()
Dir1.Path = Drive1.Drive
End Sub

Private Sub Exit_Click()
End
End Sub

Private Sub File1_Click()
If Combo1.ListIndex = 0 Then
File1.Pattern = ("*.wav")
ElseIf Combo1.ListIndex = 1 Then
File1.Pattern = ("*.mid")
ElseIf Combo1.ListIndex = 2 Then
File1.Pattern = ("*.avi;*.mpg")
Else
File1.Pattern = ("*.*")
End If

If Right(File1.Path, 1) <> "\" Then
filenam = File1.Path + "\" + File1.FileName
Else
filenam = File1.Path + File1.FileName
End If
Text1.Text = filenam

End Sub


Private Sub MMPlayer_Click()

End Sub

Private Sub Picture1_Click()

End Sub

Private Sub play_Click()
MMPlayer.FileName = Text1.Text
MMPlayer.Command = "Open"
MMPlayer.Command = "Play"
MMPlayer.hWndDisplay = videoscreen.hWnd
End Sub


Private Sub stop_Click()
If MMPlayer.Mode = 524 Then Exit Sub
If MMPlayer.Mode <> 525 Then
MMPlayer.Wait = True
MMPlayer.Command = "Stop"
End If
MMPlayer.Wait = True
MMPlayer.Command = "Close"
End Sub
Lesson 17: Creating Multimedia Applications-Part 3

In lesson 16, we have created an audio player. Now, with some modifications, we will transform the audio player into a picture viewer. This player will be created in such a way that it could search for all types of graphics your drives and play them.

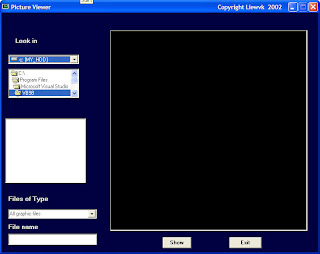
Similar to the previous project, in this project, you need to insert a ComboBox, a DriveListBox, a DirListBox, a TextBox and a FileListBox into your form. I Shall brieflyexplain again the function of each of the above controls.

  • ComboBox- to display and enable selection of different type of files.
  • DriveListBox- to allow selection selection of different drives available on your PC.
  • DirListBox - To display directories
  • TextBox - To display selected files
  • FileListBox- To display files that are available

Relevant codes must be written to coordinate all the above controls so that the application can work properly. The program should flow in the following logical way:

Step 1: User choose the type of files he wants to play.

Step2:User selects the drive that might contains the relevant graphic files.

Step 3:User looks into directories and subdirectories for the files specified in step1. The files should be displayed in the FileListBox.

Step 4: User selects the files from the FileListBox and click the Show button.

Step 5: User click on Exit button to end the application.

¡¡

The Interface


The Code

Private Sub Form_Load()
Left = (Screen.Width - Width) \ 2
Top = (Screen.Height - Height) \ 2

Combo1.Text = "All graphic files"
Combo1.AddItem "All graphic files"
Combo1.AddItem "All files"

End Sub
¡¡

Private Sub Combo1_Change()
If ListIndex = 0 Then
File1.Pattern = ("*.bmp;*.wmf;*.jpg;*.gif")
Else
Fiel1.Pattern = ("*.*")
End If

End Sub


Private Sub Dir1_Change()

File1.Path = Dir1.Path
File1.Pattern = ("*.bmp;*.wmf;*.jpg;*.gif")


End Sub

Private Sub Drive1_Change()
Dir1.Path = Drive1.Drive
End Sub

Private Sub Exit_Click()
End
End Sub

Private Sub File1_Click()
If Combo1.ListIndex = 0 Then
File1.Pattern = ("*.bmp;*.wmf;*.jpg;*.gif")
Else
File1.Pattern = ("*.*")
End If

If Right(File1.Path, 1) <> "\" Then
filenam = File1.Path + "\" + File1.FileName
Else
filenam = File1.Path + File1.FileName
End If
Text1.Text = filenam

End Sub


Private Sub play_Click()
MMPlayer.FileName = Text1.Text

End Sub


Private Sub show_Click()
If Right(File1.Path, 1) <> "\" Then

filenam = File1.Path + "\" + File1.FileName
Else
filenam = File1.Path + File1.FileName
End If

picture1.Picture = LoadPicture(filenam)
End Sub

Lesson 15: Creating Multimedia Applications

You can create various multimedia applications in VB that couold play audio CD, audiofiles, VCD , video files and etc.
To be able to play multimedia files or multimedia devices, you have to insert Microsoft Multimedia Control into your VB applications
that you are going to create. However, Microsoft Multimedia Control is not normally included in the startup toolbox, therefore you need
to add the MM control by pressing Ctrl+T and select it from the components dialog box that is displayed.

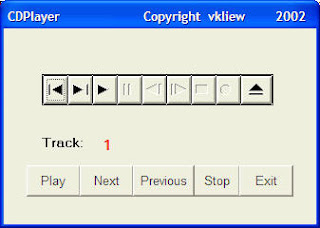
15.1 Creating a CD player

(a) The Interface.


Private Sub Form_Load()
'To position the page at the center
Left = (Screen.Width - Width) \ 2
Top = (Screen.Height - Height) \ 2
'Open the CD
myCD.Command = "Open"

End Sub
Private Sub myCD_StatusUpdate()
'Update the track number
trackNum.Caption = myCD.Track
End Sub

Private Sub Next_Click()
myCD.Command = "Next"
End Sub

Private Sub Play_Click()
myCD.Command = "Play"

End Sub

Private Sub Previous_Click()
myCD.Command = "Prev"
End Sub

Private Sub Stop_Click()
myCD.Command = "Stop"
End Sub
Private Sub Exit_Click()
End
End Sub

Lesson 14: Working with Files

14.1 Introduction

Up until lesson 13 we are only creating programs that could accept data at runtime, when a program is terminated, the data also disappear. Is it possible to save data accepted by a VB
program into a storage device, such as a hardisk or diskette, or even CDRW? The answer is possible. Is this chapter, we will learn how to create files by writing them into a storage device and then retrieve the data by reading the contents of the files using customized VB programs.

14.2 Creating files

To create a file , use the following command

Open "fileName" For Output As #fileNumber

Each file created must have a file name and a file number for identification. As for file name, you must also specify the path where the file will reside.

For example

Open "c:\My Documents\sample.txt" For Output As #1

will create a text file by the name of sample.txt in the My Document folder. The accompany file number is 1. If you wish to create and save the file in A drive, simply change the path, as follows"

Open "A:\sample.txt" For Output As #1

If you wish to create a HTML file , simple change the extension to .html

Open "c:\My Documents\sample.html" For Output As # 2

14.2.1 Sample Program : Creating a text file

Private Sub create_Click()
Dim intMsg As String
Dim StudentName As String

Open "c:\My Documents\sample.txt" For Output As #1
intMsg = MsgBox("File sample.txt opened")
StudentName = InputBox("Enter the student Name")
Print #1, StudentName
intMsg = MsgBox("Writing a" & StudentName & " to sample.txt ")

Close #1

intMsg = MsgBox("File sample.txt closed")
End Sub

* The above program will create a file sample.txt in the My Documents' folder and ready to receive input from users. Any data input by users will be saved in this text file.

14.3 Reading files

To read a file created in section 14.2, you can use the input # statemment. However, we can only read the file according to the format when it was written. You have to open the file according to its file number and the variable that hold the data. We also need to declare the variable using the DIM command.

14.3.1 Sample Program: Reading file

Private Sub Reading_Click()
Dim variable1 As String
Open "c:\My Documents\sample.txt" For Input As #1
Input #1, variable1
Text1.Text = variable1
Close #1

End Sub

* This program will open the sample.txt file and display its contents in the Text1 textbox.

Lesson 13: Arrays

13.1 Introduction to Arrays

By definition, an array is a list of variables, all with the same data type and name. When we work with a single item, we only need to use one variable. However, if we have a list of items which are of similar type to deal with, we need to declare an array of variables instead of using a variable for each item. For example, if we need to enter one hundred names, instead of declaring one hundred different variables, we need to declare only one array. We differentiate each item in the array by using subscript, the index value of each item, for example name(1), name(2),name(3) .......etc.

13.2 Declaring Arrays

We could use Public or Dim statement to declare an array just as the way we declare a single variable. The Public statement declares an array that can be used throughout an application while the Dim statement declare an array that could be used only in a local procedure.

The general format to declare an array is as follow:

Dim arrayName(subs) as dataType

where subs indicates the last subscript in the array.

Example 13.1

Dim CusName(10) as String

will declare an array that consists of 10 elements if the statement Option Base 1 appear in the declaration area, starting from CusName(1) to CusName(10). Otherwise, there will be 11 elements in the array starting from CusName(0) through to CusName(10)

Example 13.2

Dim Count(100 to 500) as Integer

declares an array that consists of the first element starting from Count(100) and ends at Count(500)

13.3 Sample Programs

(i) The Interface


The codes

Dim studentName(10) As String
Dim num As Integer

Private Sub addName()
For num = 1 To 10
studentName(num) = InputBox("Enter the student name", "Enter Name", "", 1500, 4500)
If studentName(num) <> "" Then
Form1.Print studentName(num)
Else
End
End If

Next
End Sub

Private Sub Exit_Click()
End
End Sub

Private Sub Start_Click()
Form1.Cls
addName

End Sub

The above program accepts data entry through an input box and displays the entries in the form itself. As you can see, this program will only allows a user to enter 10 names each time he click on the start button.

Lesson 12: Creating VB Functions For MS Excel

12.2 The Needs to Create User-Defined Functions in MS-Excel

You can create your own functions to supplement the built-in functions in Microsoft Excel spreadsheet which are quite limited. These functions could be very useful and powerful if you know how to program them properly. One main reason we need to create user defined functions is to enable us to customize our spreadsheet environment for individual needs. For example, we might need a function that could calculate commissions payment based on the sales volume, which is quite difficult if not impossible by using the built-in function alone. Lets look at the table below:

Table 12.1: Commissions Payment Table

Sales Volume($)
Commissons
<500
3%
<1000
6%
<2000
9%
<5000
12%
>5000
15%

In the above table, if a saleman attain a sale volume of $6000, he will be paid $6000x12%=$720.00. A visual basic function to calculate the commissions could be written as
follows:
Function Comm(Sales_V As Variant) as Variant
If Sales_V <500 comm="Sales_V*0.03">=500 and Sales_V<1000 comm="Sales_V*0.06">=1000 and Sales_V<2000 comm="Sales_V*0.09">=200 and Sales_V<5000 comm="Sales_V*0.12">=5000 Then
Comm=Sales_V*0.15
End If
End Function

12.2 Using Microsoft Excel Visual Basic Editor

To create User Defined functions in MS Excel, you can click on tools, select macro and then click on Visual Basic Editor as shown in Figure 12.1


Figure 12.1: Inserting Ms_Excel Visual Basic Editor


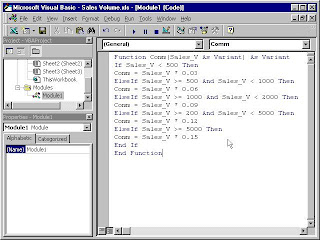
Upon clicking the Visual Basic Editor, the VB Editor windows will appear as shown in figure 12.2. To create a function, type in the function as illustrated in section 12.1 above After typing, save the

file and then return to the Excel windows.

Figure 12.2 : The VB Editor


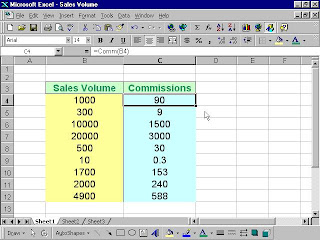
In the Excel windows, type in the titles Sales Volume and Commissions in any two cells. By refering to figure 12.3, key-in the Comm function at cell C4 and by referencing the value in cell B4, using the format Comm(B4). Any value appear in cell B4 will pass the value to the Comm function in cell C4. For the rest of the rows, just copy the formula by draging the bottom right corner of cell C4 to the required cells, and a nice and neat table that show the commisions will automatically appear. It can also be updated anytime


Figure 12.3: MS Excel Windows- Sales Volume

Lesson 11: Introduction to VB Functions- Part II

11.1 Creating Your Own Functions

The general format of a function is as follows:

Public Function functionName (Arg As dataType,..........) As dataType

or

Private Function functionName (Arg As dataType,..........) As dataType

* Public indicates that the function is applicable to the whole program and
Private indicates that the function is only applicable to a certain module or procedure.

Example 11.1

In this example, a user can calculate future value of a certain amount of money he has today based on the interest rate and the number of years from now(supposing he will invest this amount of money somewhere). The calculation is based on the compound interest rate.


Public Function FV(PV As Variant, i As Variant, n As Variant) As Variant
'Formula to calculate Future Value(FV)
'PV denotes Present Value
FV = PV * (1 + i / 100) ^ n

End Function

Private Sub compute_Click()
'This procedure will calculate Future Value
Dim FutureVal As Variant
Dim PresentVal As Variant
Dim interest As Variant
Dim period As Variant
PresentVal = PV.Text
interest = rate.Text
period = years.Text

FutureVal = FV(PresentVal, interest, period)
MsgBox ("The Future Value is " & FutureVal)
End Sub

Example 11.2

The following program will automatically compute examination grades based on the marks that a student obtained.


Public Function grade(mark As Variant) As String
Select Case mark
Case Is >= 80
grade = "A"
Case Is >= 70
grade = "B"
Case Is >= 60
grade = "C"
Case Is >= 50
grade = "D"
Case Is >= 40
grade = "E"
Case Else
grade = "F"
End Select

End Function

Private Sub compute_Click()

grading.Caption = grade(mark)

End Sub

Private Sub End_Click()
End

End Sub