2.1 Creating Your First Application
In this section, we are not going into the technical aspects of VB programming; just have a feel of it. Now, you can try out the examples below:
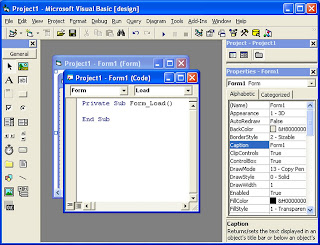
Example 2.1.1 is a simple program. First of all, you have to launch Microsoft Visual Basic. Normally, a default form Form1 will be available for you to start your new project. Now, double click on form1, the source code window for form1 as shown in figure 2.1 will appear. The top of the source code window consists of a list of objects and their associated events or procedures. In figure 2.1, the object displayed is Form and the associated procedure is Load.
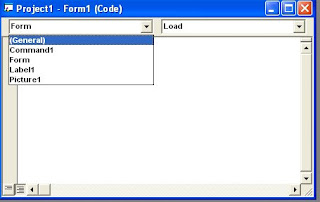
When you click on the object box, the drop-down list will display a list of objects you have inserted into your form as shown in figure 2.2. Here, you can see a form, command button with the name Command1, a Label with the name Label1 and a PictureBox with the name Picture1. Similarly, when you click on the procedure box, a list of procedures associated with the object will be displayed as shown in figure 2.3. Some of the procedures associated with the object Form are Activate, Click, DblClick (which means Double-Click) , DragDrop, keyPress and etc. Each object has its own set of procedures. You can always select an object and write codes for any of its procedure in order to perform certain tasks.
You do not have to worry about the beginning and the end statements (i.e. Private Sub Form_Load.......End Sub.); Just key in the lines in between the above two statements exactly as are shown here. When you run the program, you will be surprise that nothing shown up .In order to display the output of the program, you have to add the Form1.show statement like in Example 2.1.1 or you can just use Form_Activate ( ) event procedure as shown in example 2.1.2. The command Print does not mean printing using a printer but it means displaying the output on the computer screen. Now, press F5 or click on the run button to run the program and you will get the output as shown in figure 2.4.
You can also perform simple arithmetic calculations as shown in example 2.1.2. VB uses * to denote the multiplication operator and / to denote the division operator. The output is shown in figure 2.3, where the results are arranged vertically.

Figure 2.2: List of Objects

Figure 2.2: List of Procedures
Example 2.1.1
Private Sub Form_Load ( )
Form1.show
Print “Welcome to Visual Basic tutorial”
End Sub
Figure 2.4 : The output of example 2.1.1
Example 2.1.2
Private Sub Form_Activate ( )
Print 20 + 10
Print 20 - 10
Print 20 * 10
Print 20 / 10
End Sub
Figure 2.5: The output of example 2.1.2
Example 2.1.2 can also be written as
Private Sub Form_Activate ( )
Print 20 + 10, 20 – 10, 20 * 10, 20 / 10
End Sub
The numbers will be arranged in a horizontal line separated by spaces as shown in figure 2.6
Figure 2.6: Output in a horizontal line
Example 2.1.3 is an improved version of example 2.1.2 as it employs two variables x and y and assigned initial values of 20 and 10 to them respectively. When you need to change the value of x and y, just change the initial values rather than changing every individual value which is more time consuming.
Example 2.1.3
Private Sub Form_Activate ( )
x = 20
y = 10
Print x + y
Print x - y
Print x * y
Print x / y
End Sub
Besides, you can also use the + or the & operator to join two or more texts (string) together like in example 2.1.4 (a) and (b)
Example 2.1.4(a)
Private Sub
A = Tom
B = “likes"
C = “to"
D = “eat"
E = “burger"
Print A + B + C + D + E
Example 2.1.4(b)
Private Sub
A = Tom
B = “likes"
C = “to"
D = “eat"
E = “burger"
Print A & B & C & D & E
The Output of Example 2.1.4(a) &(b) is as shown in Figure 2.7.
2.2 Steps in Building a Visual Basic Application
Generally, there are three basic steps in building a VB application. The steps are as follows:
Step 1 : Design the interface
Step 2 : Set Properties of the controls (Objects)
Step 3 : Write the events' procedures
Example 2.2.1
This program is a simple program that calculates the volume of a cylinder. Let design the interface:
Figure 2.8 A program to calculate the Volume of a Cylinder
First of all, go to the properties window and change the form caption to Volume of Cylinder, then drag and insert three labels into the form and change their captions to Base Radius, height and volume respectively. After that, insert three Text Boxes and clear its text contents so that you get three empty boxes. Named the text boxes as radius, hght (we cannot use height as it is the built-in control name of VB) and volume respectively. Lastly, insert a command button and change its caption to O.K and its name to OK. Now save the project as cylinder.vbp and the form as cylinder.vbp as well. We shall leave out the codes at the moment which you shall learn it in lesson3.
Example 2.2.2
Designing an attractive and user friendly interface should be the first step in constructing a VB program. To illustrate, let's look at the calculator program.
Figure 2.9: Calculator
Now, follow the steps below to design the calculator interface.
*
Resize the form until you get the size you are satisfied with.
*
Go to the properties window and change the default caption to the caption you want, such as 32-bit Calculator.
*
Change other properties of the form, such as background color, foreground color, border style. I recommend you set the following properties for Form1 for this calculator program:
BorderStyle
MaxButton
minButton
Fixed Single
False
True
These properties will ensure that the users cannot resize or maximize your calculator window, but able to minimize the window. Draw the Display Panel by clicking on the Label button and and place your mouse on the form. Start drawing by pressing down your mouse button and drag it along.Click on the panel and the corresponding properties window will appear. Clear the default label so that the caption is blank (because the display panel is supposed to show the number as we click on the number button). It is better to set the background color to a bright color while the foreground color should be something like black (for easy viewing). Change the name to display as I am going to use it later to write codes for the calculator. Now draw the command buttons that are necessary to operate a calculator. I suggest you follow exactly what is shown in the image above.
Now run the project by pressing F5. If you are satisfied with the appearance, go ahead to save the project. At the same time, you should also save the file that contains your form.
No comments:
Post a Comment